Creating a Comment Box with ASP.NET Download Sample Source Code
In this exercise, we will guide you through the steps, to make a “Comment Box.” In order to help you get started quickly, we have prepared a source package that you may freely download.
Prerequisites
This tutorial is very simple, but assumes that you already have the following:
Visual Studio 2015 or newer installed on your machine.
An Account at ASPHost.net. If you don’t have one already, please subscribe here.
This tutorial is very simple, but assumes that you already have the following:
Visual Studio 2015 or newer installed on your machine.
An Account at ASPHost.net. If you don’t have one already, please subscribe here.
Steps for Developing the Comment Box Application
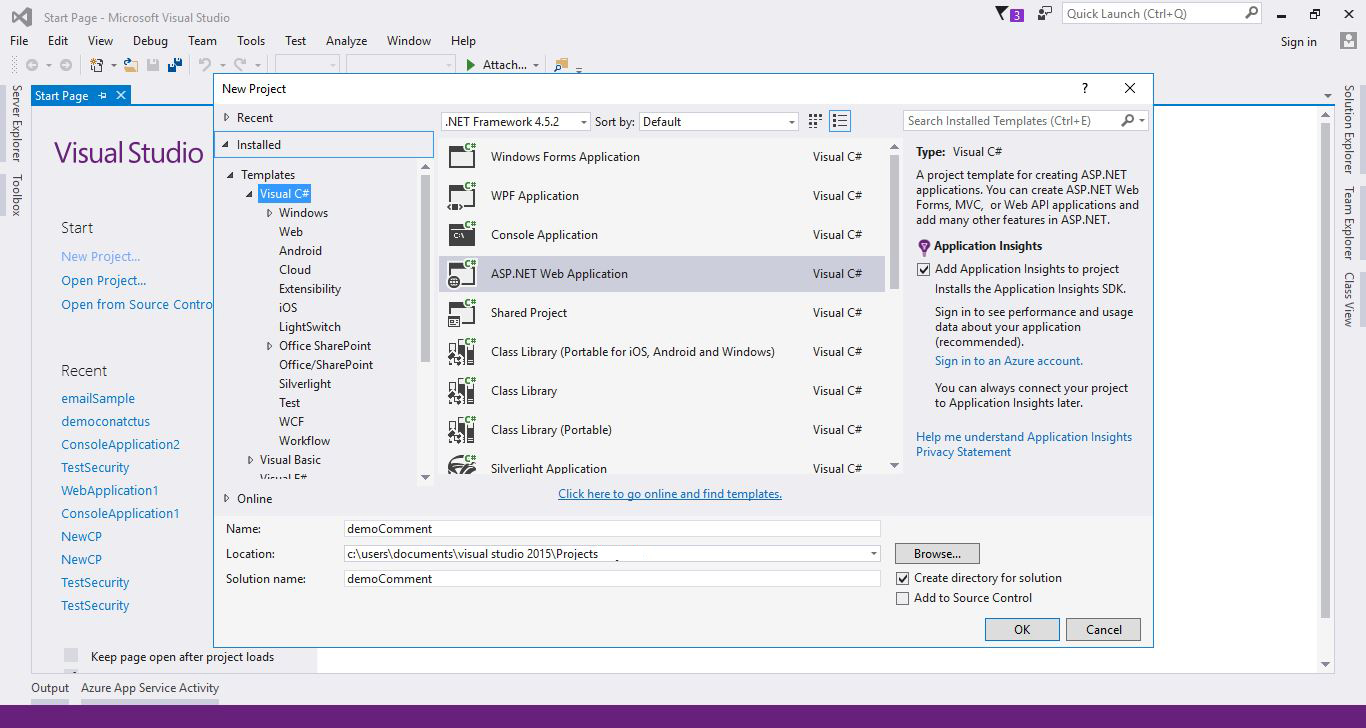
Let’s start by creating a new project. The process is quite simple: click the new project link in Visual Studio , then select “ASP.NET Web application.”Set the project name to “demoComment”, then press “OK.”
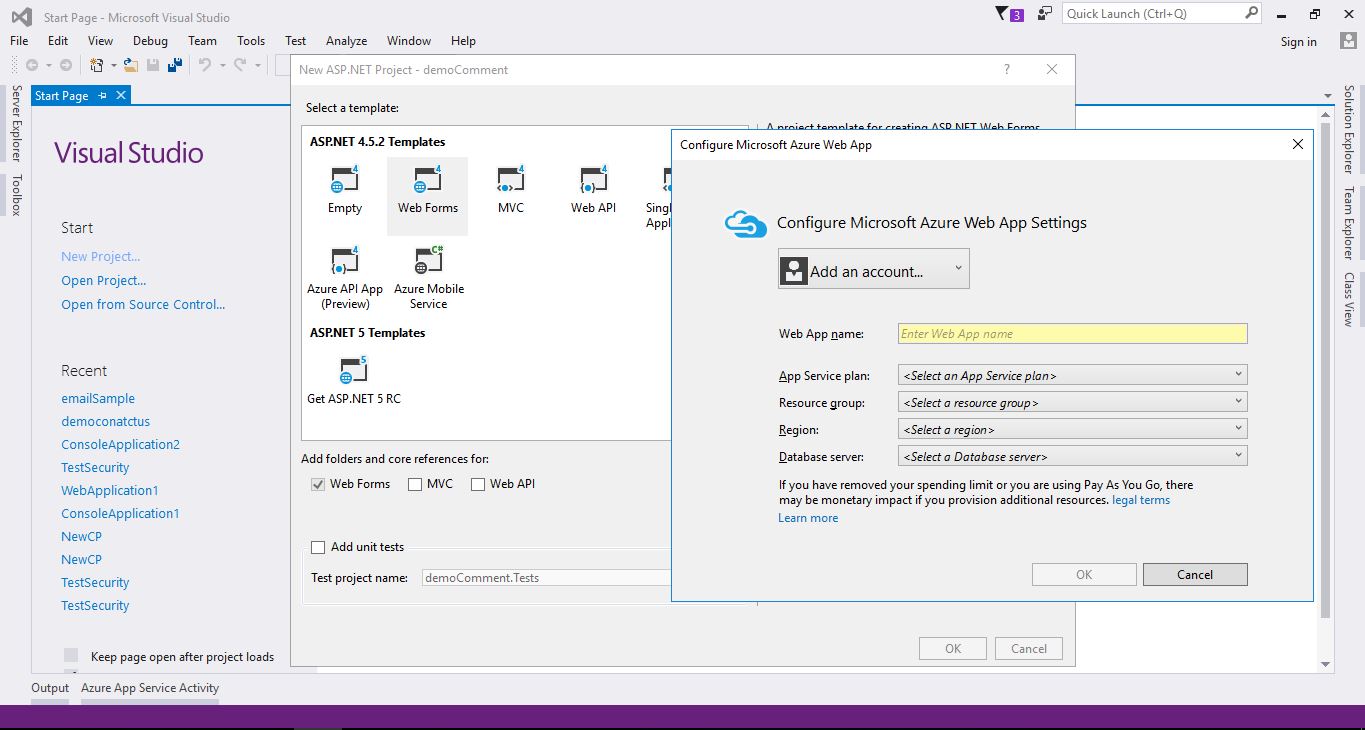
If you are prompted to setup “Azure” settings, click cancel as this step is not required for this exercise. In the templates list, make sure you select the “Web Form” template.
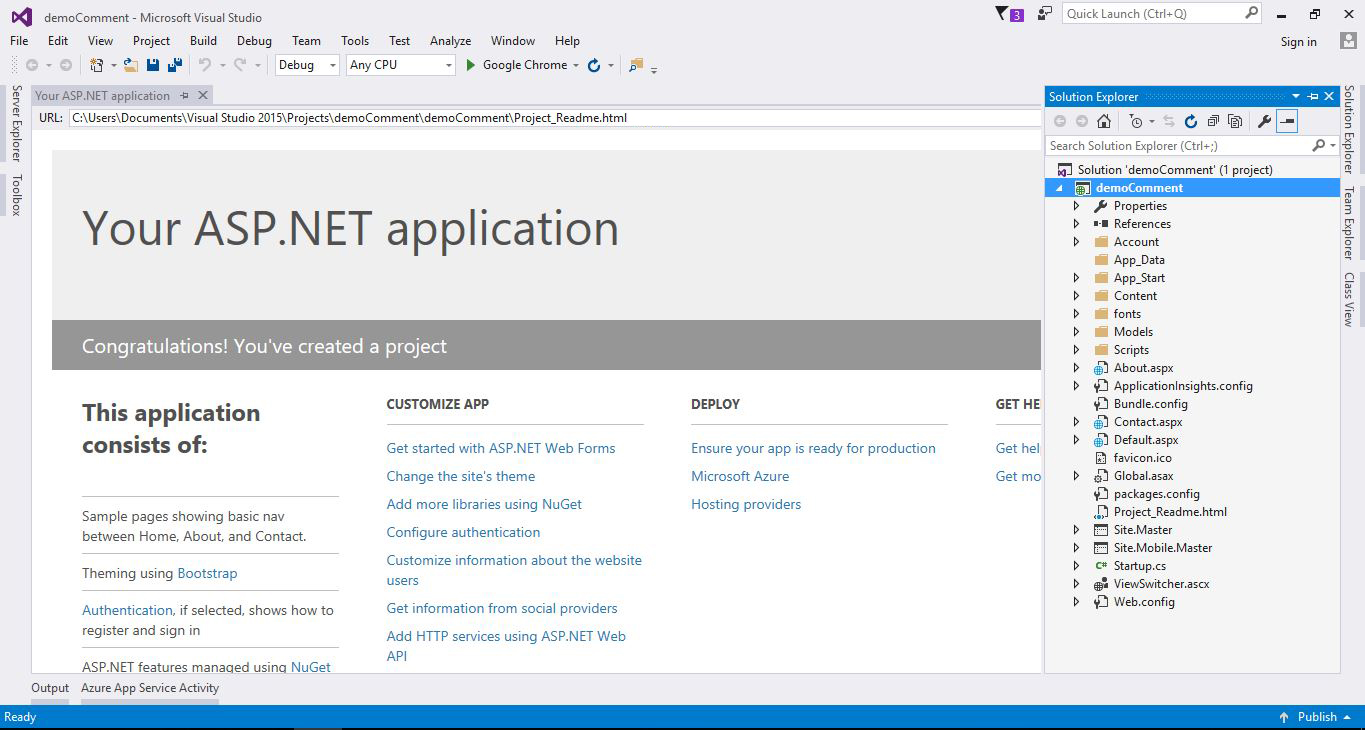
The project creation usually takes few minutes. Once done, the project automatically opens. You can browse the project files and explore the default files, which were created as part of the “Web Form” template. There are two files: “default.aspx” and “About.aspx.”
In the “About.aspx” file, replace the content with the following code snippet. This HTML code will define the layout of the comment box.
<div class="panel panel-primary" style="margin: 20px;"><div class="panel-heading">
<h3 class="panel-title">Comment Form</h3>
</div>
<div class="panel-body">
<div class="col-md-6 col-sm-6">
<div class="form-group col-md-6 col-sm-6">
<label for="name">Name* </label>
<asp:TextBox ID="name" runat="server" CssClass="form-control input-sm"></asp:TextBox>
</div>
<div class="form-group col-md-6 col-sm-6">
<label for="email">Email*</label>
<asp:TextBox ID="email" runat="server" CssClass="form-control input-sm"></asp:TextBox>
</div>
<div class="form-group col-md-6 col-sm-6">
<label for="mobile">Comment*</label>
<textarea class="form-control input-sm" id="comment" placeholder="" cols="3" rows="3" runat="server">
</textarea>
</div>
<div class="form-group col-md-6 col-sm-6">
<br />
<br />
<asp:Button ID="Button1" runat="server" Text="Post" CssClass="btn btn-success" OnClick="Button1_Click" />
</div>
</div>
<div class="col-md-6 col-sm-6">
<asp:Repeater ID="Repeater1" runat="server">
<ItemTemplate>
<div class="commentbox">
<b>
<asp:Label ID="Label1" runat="server" Text='<%#Eval("Name") %>'>'></asp:Label></b> (<asp:Label ID="Label2" runat="server" Text='<%#Eval("Email") %>'>'></asp:Label>):<br />
<asp:Label ID="Label3" runat="server" Text='<%#Eval("Comment") %>'></asp:Label><br />
</div>
</ItemTemplate>
</asp:Repeater>
</div>
</div>
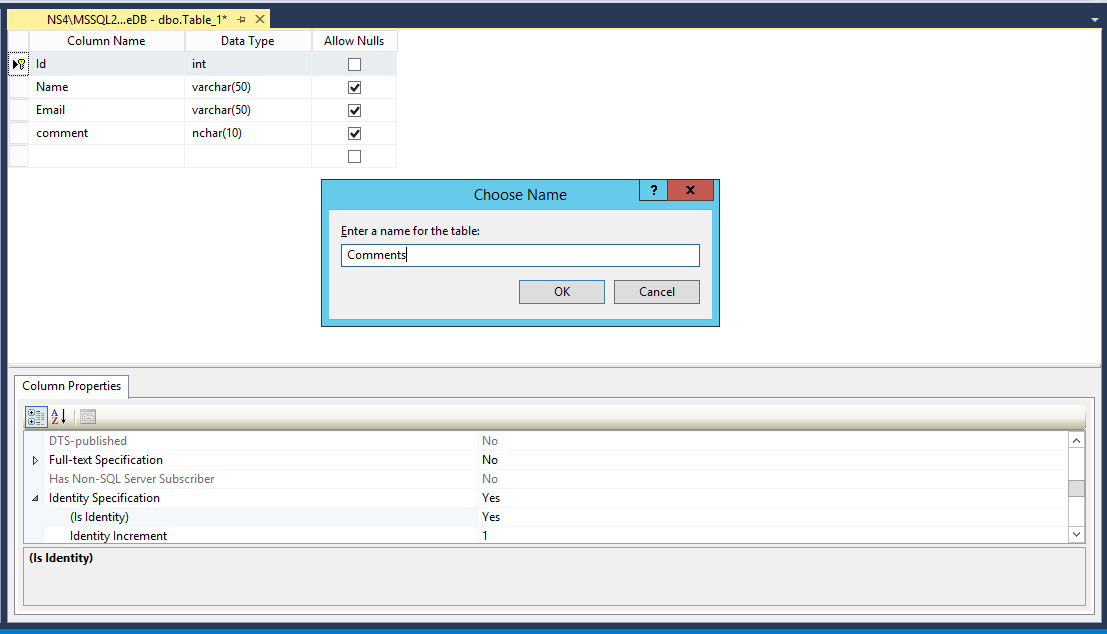
In order to persist the comments, we will need a database table. Data persistence (the technical word for saving data in a database) is an essential part of any web application.
Let’s create a database table with the following structure:
- Id
- Name
- Comment
In order to persist the comments, we will need a database table. Data persistence (the technical word for saving data in a database) is an essential part of any web application.
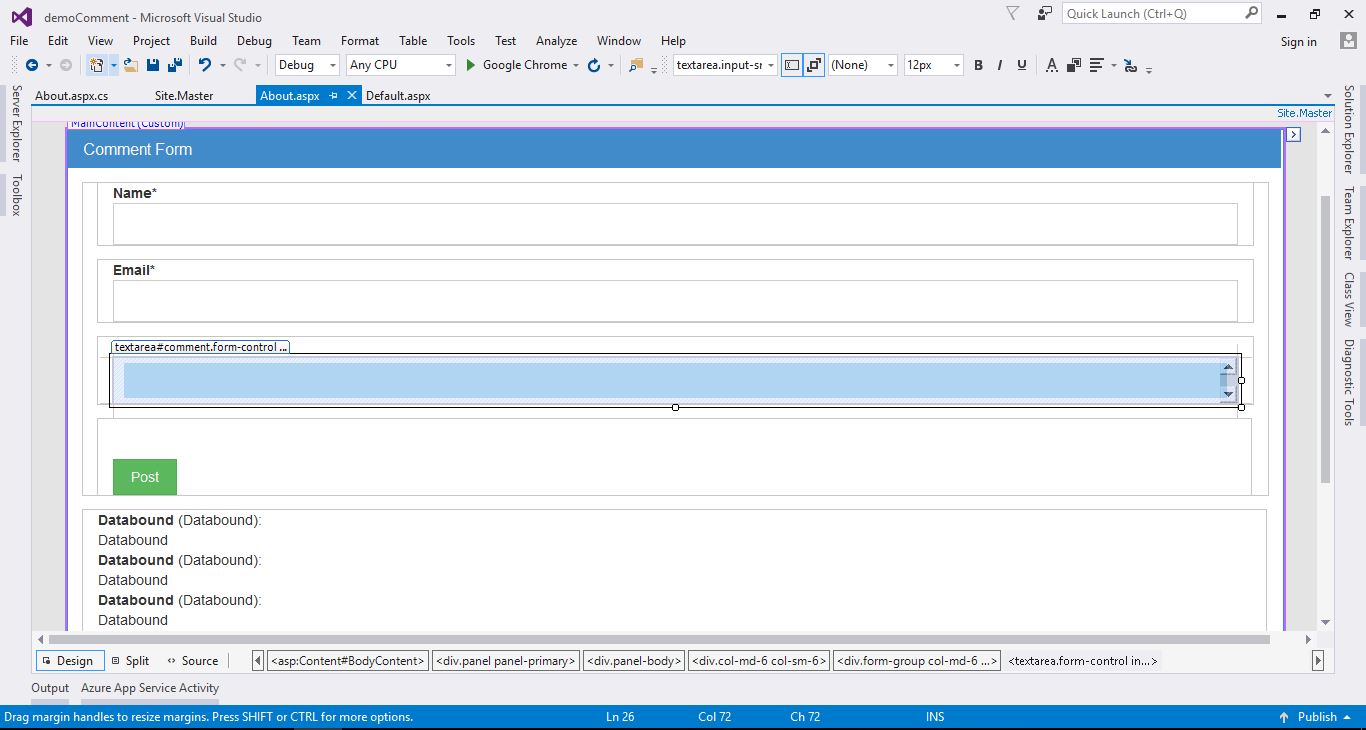
This form will be used by the users to leave comments on the web page. The action should be triggered when the user clicks on the “Post” button.
Let’s add an event handler on the “Post” button. This is easily done on Visual Studio: simply double click on the button, in the design mode. This will generate an action skeleton called “Button1_Click”.
Let’s add an event handler on the “Post” button. This is easily done on Visual Studio: simply double click on the button, in the design mode. This will generate an action skeleton called “Button1_Click”.
protectedvoid Button1_Click(object sender, EventArgs e)
{
string ConnStr = "DataSource=add your server name; Initial Catalog=demo_SampleDB;User Id=;Password=;";
SqlConnection con = newSqlConnection(ConnStr);
con.Open();
SqlCommand cmd = newSqlCommand("insert
into Comments(Name,Email,Comment) values('"+name.Text+ "','" + email.Text + "','" +comment.InnerText.Trim() + "')", con);
cmd.ExecuteNonQuery();
con.Close();
ScriptManager.RegisterStartupScript(this, this.GetType(), "popup", "alert('Comment Posted Successfully.');window.location=About.aspx';", true);
getComment();
}
The previous code (the “button1_Click” method) will retrieve the data sent by the user and save it to the database. Now we will need another function that retrieves (reads) this data and display it on the page. The following code snippet illustrates the “data retrieval” concept:
protectedvoid Button1_Click(object sender, EventArgs e)
{
string ConnStr = "Data Source=add your server name; Initial Catalog=demo_SampleDB;User Id=;Password=;";
SqlConnection con = newSqlConnection(ConnStr);
con.Open();
SqlCommand cmd = newSqlCommand("
insert into Comments(Name,Email,Comment) values('"+name.Text+ "','" + email.Text + "','" +comment.InnerText.Trim() + "')", con);
cmd.ExecuteNonQuery();
con.Close();
ScriptManager.RegisterStartupScript(this, this.GetType(), "popup", "alert('Comment Posted Successfully.');window.location=About.aspx';", true);
getComment();
}
We now have a function that retrieves the comments from the database. It would be more practical to automatically load comments on the page load. For this particular use-case, we can use the “Page_Load” event. The following code illustrates this:
        protectedvoid Page_Load(object sender, EventArgs e)
        {


if (!IsPostBack)
            {
                getComment();
            }

        }
At this point, your code is ready to be tested. Run the application from Visual Studio by clicking the run button on the toolbar or pressing the “F5” shortcut.

Fill in the fields and press “Post.” This will trigger the “Button1_Click” function, which will save the comment’s data to the database. Then the page will reload. Since we have used the Page_Load event, it will automatically call the “getComment” function which will display the comments on the page.
